The microstructure of cold hardened nickel alloys plays an important role in toughness, corrosion resistance, and environmental cracking resistance. The microstructure plays a much lesser role in strength and ductility, which are more directly related to the cold work imparted.
The manufacturing of cold hardened tubulars begins with an as-cast ingot of the required chemical composition, which is then hot worked to an intermediate billet or tube hollow, and annealed prior to the final cold working operations, resulting in the desired dimensions and mechanical properties. Hot-working is necessary in order to break up the as-cast dendritic structure and obtain a fully wrought structure. The amount of hot work required is process dependent, however, a minimum of 3 to 1 reduction has been accepted as an industry standard for tubulars used in oil & gas production, and so specified in ISO 13680 and API 5CRA. During cooling from the hot working operation, intermetallic phases, carbides, and/or nitrides may precipitate, which are detrimental to toughness and corrosion resistance. As a result, this may lead to failures in service from localized corrosion, stress corrosion cracking, or hydrogen embrittlement. Therefore, a proper annealing cycle is required to dissolve the precipitates, followed by sufficiently rapid cooling to keep the reactive elements in the solid solution.
Presented below for comparison, are photomicrographs from three samples of alloy 825 in different conditions. The first is an example of poorly heat-treated material, as evidenced by the volume fraction and distribution of carbides along the grain boundaries. This material fails to meet the microstructural requirements of ISO 13680 and API 5CRA and would likely fail to meet the charpy v-notch requirements in the final cold worked condition due to these brittle precipitates providing an easy path for crack propagation. The second sample is from properly heat-treated material exhibiting the desired clean grain boundaries with a few isolated precipitates. The third sample is from that same material after the final cold working operations. The cold work has distorted the grains, however, the cleanliness of the microstructure is still quite apparent.
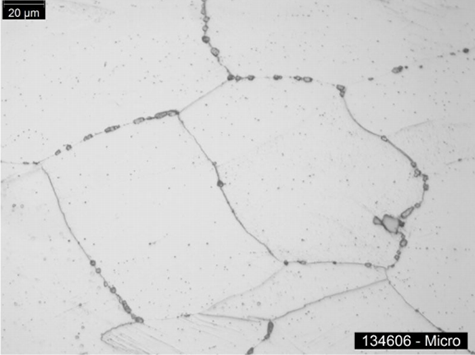

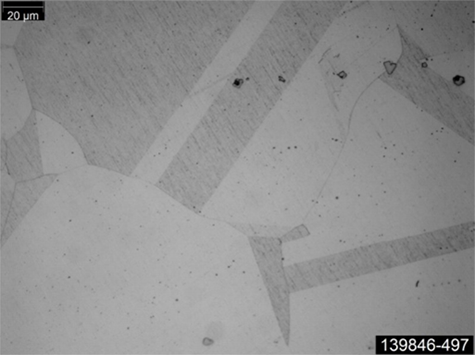

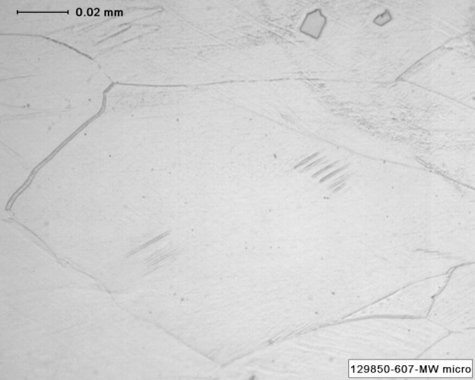

ISO 13680 and API 5CRA require a microstructural evaluation to be performed between the final annealing and cold work operations. These specifications require the microstructure to be free of intermetallic phases and carbides/nitrides precipitates, except for discrete standalone precipitates, and the grain boundaries must be free of continuous networks of precipitates. Evident from Example 3, the presence or absence of precipitates is still apparent following cold work, so these requirements can be evaluated in the final condition. It is, however, best practice to perform this evaluation prior to cold work in order that an unacceptable condition may be remedied by re-annealing.
A recent addition to ISO 13680 and API 5CRA is the requirement to report the grain size for information only. A grain size acceptance criteria hasn’t been provided and there aren’t any available reports supporting a relationship between grain size and the performance of cold work nickel alloys in oil and gas production. However, if a grain size requirement is to be met, it can only be determined in the annealed condition since the conventional grain size measurement techniques assume equiaxed grains.
In summary, in the event the microstructure evaluation was not performed in the annealed condition, it is still possible to evaluate the microstructure of the final product and safely determine the presence or lack of intermetallic phases and carbides/nitrides precipitates. The grain size cannot be measured at that stage, however, there are no grain size restrictions in ISO 13680 and API 5CRA.